Faux Tortoiseshell Pattern Finish
This step-by-step sample combines two great finishes: Layered metallic plaster and an easy Tortoiseshell effect with a troweled metallic waxes, topped with a rich stain finish.
Faux Effects International® Products: Order via our Affiliate Link Here
- Palette Deco™ Colors: Bronze, Copper, Metallic Red
- Lusterstone™ Colors: Charred Olive, Bordeaux,Tequila Sunrise
- Van Dyke Brown Stain and Seal™
Tools: Order via Royal Design Studio Here
- Liberon™ Wax: Neutral
- Pavan Venetian Trowel
- Japan Scrapers
- Cheesecloth
Preparation: To establish a nice depth of color, begin with a black background. In this case, two coats of Black Aquabond is used for the base coat. Allow to dry completely
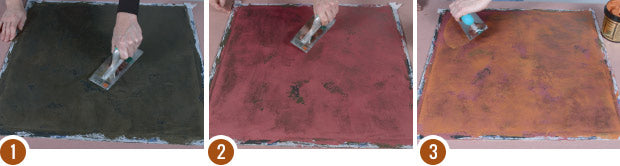
Step 1: Apply a thin, textural coat of Charred Olive Lusterstone over the black base, leaving some random, irregular "open" areas that allow the base coat to show through.
Step 2: Use Bordeaux to trowel on a "thick and thin", slightly textured layer over the Charred Olive. Some areas should be thin enough to allow the Olive color to come through and influence the red, while some will left be slightly thicker to create more coverage. Still maintain some random, completely open areas within the design.
Step 3: Next, apply a layer of Tequila Sunrise in the same manner. Trowel thick and thin, slightly fill the previous layers and maintain a random, open feel. STOP HERE if you are just looking for a great Lusterstone finish that can be left "as is" or enriched by waxing with a tinted wax such as Liberon Medium Oak.
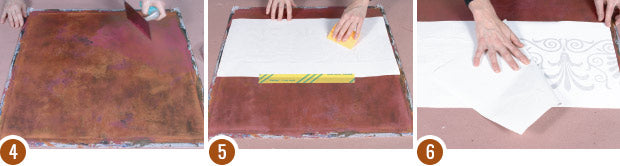
Step 4: To "calm" the background more and create a nicer base for the Tortoiseshell finish, thin some Bordeaux Lusterstone about 10% with water and apply a very tight smoothing and toning layer. Allow to dry completely before proceeding with the Modello® stencil application.
Step 5: Tape the Modello® stencil into place with a long, stable tape "hinge". Burnish the top transfer tape covering the Modello® stencil by using a hard pressure with a squeegee or taping knife.
Step 6: Flip the Modello® stencil back along the tape "hinge" and slowly peel the release paper backing off. Pull it back at a 180-degree angle to get an easier and cleaner release.
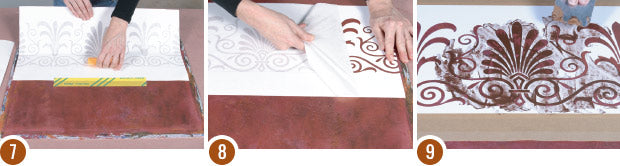
Step 7: Flip the pattern back again on the hinge. Roll the now exposed adhesive Modello® stencil back onto the surface slowly as you press and smooth with your hand, squeegee or taping knife.
Step 8: Now peel off the top transfer paper (again at a 180-degree angle) to expose the pattern. Burnish again to ensure a tight, clean seal to the surface and remove any air bubbles. Apply additional tape around the edges of the Modello® stencil to protect the background.
Step 9: Use a small Japan Scraper to "blade" on Bronze Palette Deco. Use short, random, shallow strokes to apply the medium. Aim for about 40% coverage, leaving open areas that will be filled in with subsequent layers and colors.
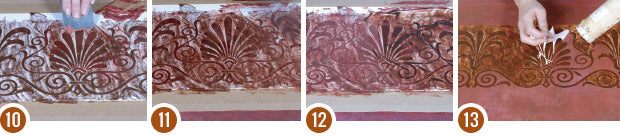
Step 10: Allow the first layer to dry completely to preserve the pattern and integrity of the individual colors. Use a hair dryer to speed up the drying time if necessary. Apply a layer of Metallic Red Palette Deco, using the same trowel and technique to cover some of the previous layer and more of the background.
Step 11: When dry, apply a final layer of Copper Palette Deco in the same manner as above to now completely fill in the design area. Allow to dry.
Step 12: Finally, use Van Dyke Brown Stain and Seal to tone and complete the finish. Use a Japan Scraper again to apply the Stain with short strokes. Note that the stain will dry quickly so just work in small areas at a time. Apply and then use a hard pressure to remove the excess, leaving the stain primarily in the slightly recessed areas of the texture.
Step 13: When completely dry, remove the Modello® stencil to expose the design. A hair dryer can be helpful for warming the adhesive and allowing for an even easier release from the surface.
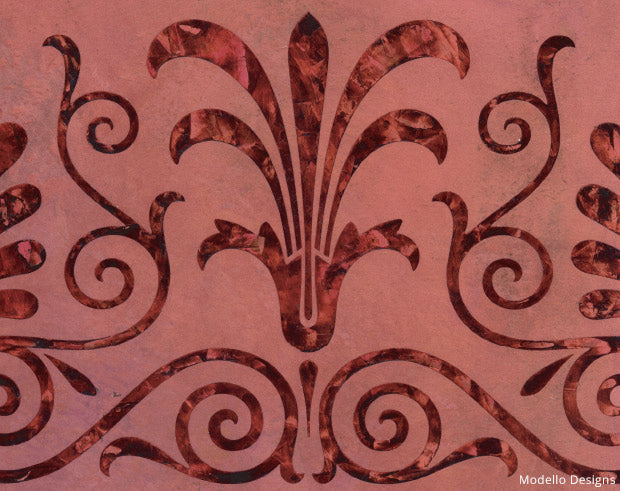
Final Detail: Note the depth of color that is create by the layering of the Palette Deco and Stain and Seal medium. For a warmer, more golden look to the Tortoiseshell, try incorporating Gold Palette Deco as well.