How to Paint a Mandala Mural with Wall Stencils
There is no place like “Om”! You can paint an easy DIY mandala mural with wall stencils from Modello Custom Stencils. These DIY Wall Mural Stencils make painting a statement wall fast and easy with no experience needed! Watch and learn how to paint a wall with large mandala mural stencils that will give you more peace of mind…
You will need: Modello Wall Mural Stencil, Squeegee and Weeding Tool (both included with your order - yeah!), Painter’s Tape, Measuring Tape, Level, Scissors or Craft Knife, Large Sponge and Water. The Modello® stencil used here is the Ananda Mandala Mural Stencil from our DIY Mural Stencils Collection. Watch this helpful video on how to apply and paint Modello® vinyl stencils…
All Modello® stencils consist of three layers:
- The protective Backing Paper which protects the adhesive side of the stencil
- The cut vinyl stencil pattern
- The translucent Transfer Tape that is applied after production to hold the pattern together as it is transferred to your surface
Important Steps BEFORE You Install Your Modello® Wall Mural Stencil
Lay your Modello® down on a hard surface, such as a large tabletop.
Use the Squeegee to burnish BOTH sides of the Modello® stencil really well. This will ensure that Transfer Tape is stuck securely to the vinyl stencil so that the Backing Paper comes off cleanly and easily.
To make the installation even easier you can “pre-release” the Backing Paper after burnishing. Here’s how….
With the Backing Paper side up, carefully peel the Backing Paper back from the Modello® stencil at a 180-degree angle. Do this slowly so you can see that the vinyl stencil is staying stuck to the Transfer Tape.
Peel the stencil back halfway and then smooth it back down lightly. Then peel back the other half and smooth it back down.
Place and Level
Measure for placement of your Modello® stencil. You should place this first “tile” of an allover stencil pattern at the center of the ceiling line.
Put the Modello® stencil in place, securing it with a couple of pieces of painter's tape.
Double check your measurements and use a bubble level to make sure that the pattern is level.
Once it’s in place, run a large piece of Painter’s Tape across the middle of the pattern. Extend the tape out on each side enough to make sure that it will stay secure during the stencil installation process.
Modello® DIY Mural Stencil Installation
Remove the small pieces of tape and allow the top half of the pattern to fall down.
Peel up the Backing Paper carefully from the stencil. Use scissors or a craft knife to cut the Backing Paper away.
Smooth the exposed Modello® stencil from the tape line up onto your surface using the flat of your hand and a sweeping motion as slowly you roll the stencil onto the surface.
Use the squeegee to burnish and secure the stencil in place.
Remove the center tape line and now pull the stencil up from the bottom.
Peel the Backing Paper away completely. Note: This can be done in smaller, more manageable sections if you are working alone.
Smooth the stencil down on to the wall with the same sweeping hand technique. Burnish the whole stencil onto the surface again with the squeegee.
Repeat with the other “tiles” to install the entire Modello® allover stencil on your feature wall.
Remove the Transfer Tape
For large Modello® stencils you will find it easier to remove the Transfer Tape if you moisten it. Wetting the paper Transfer Tape slightly will help the adhesive release easier.
Wet the sponge and wring it out well. You don’t want dripping water, just a dampened sponge.
Run the sponge over the surface of the Transfer Tape, beginning at the top. You will see the tape begin to wrinkle and pull away from the vinyl stencil slightly.
While it's still damp, begin to peel the Transfer Tape from the top down. For large Modello® stencils we recommend just working on one section at a time.
PRO TIP: We find it’s easiest to always pull the tape towards yourself and use the flat parts of your hands to push the vinyl stencil to the wall as you pull the Transfer Tape away.
Pull the Transfer Tape off slowly and watch to be sure that there are no smaller vinyl elements coming with it. If there are simply push or burnish them back in place as you continue to pull the tape.
Fold or cut the excess Transfer Tape away as you go and always pull the tape off in one main direction.
When the Transfer Tape removal is complete, burnish the vinyl stencil on the wall one last time.
Painting the Wall Mural Stencil Pattern
Now you are ready to decorate!
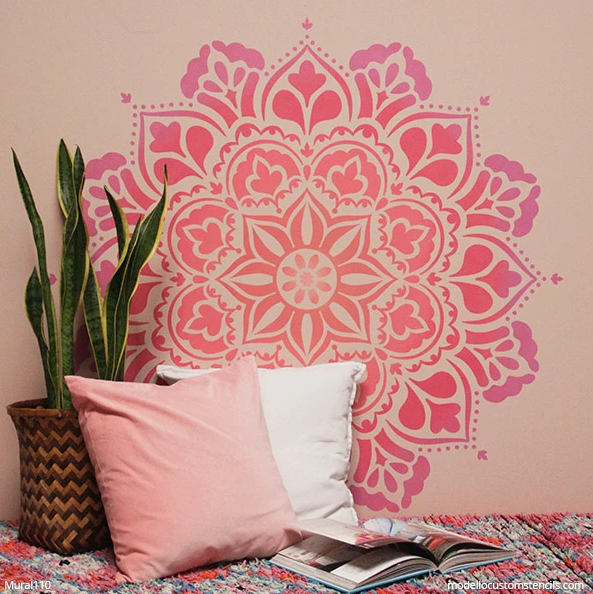
Load a 3” stencil brush with a pink paint color. Remember to offload excess paint onto a paper towel so you end up stenciling with minimal paint. Stencil the wall design with circular motions about 10 inches out from the center.
Load and offload a 1.5” stencil brush with the lightest pink color. Stencil the center, overlap with the first color, and blend.
With a third pink color, paint about 5 inches around the first pink paint color. Overlap to blend the colors. Repeat with a slightly darker color. Use a 5th color to finish painting the mandala wall design.
Remove the vinyl stencil design from the wall and DONE! You now have a stenciled mandala mural done the fast and easy way!
There are so many pattern possibilities by using Modello® Stencils if you wish to decorate with more than just paint. See how we used vinyl stencils to create a Gilded Metallic Design with Modello Vinyl Wall Stencils.